12.1: Loaders
Contents:
One of the major reasons users abandon apps is startup time. Research shows that if an app or page takes more than 3 seconds to load, 40% of users will abandon it. This number varies somewhat depending on the study, but the overwhelming fact is that user retention is strongly tied to app loading speed.
App load time is directly related to whatever happens on the UI thread. The less work your UI thread has to do, the faster your users will see the page. There are many factors that affect app startup time, and you will learn more about app performance in a later chapter. One of the big, obvious actions that affect performance is how long it takes for your app to load its data.
If you know exactly where your data is coming from, you can potentially optimize by loading it yourself. If your data is supplied by a content provider, you may not know what the backend is, and you may not know whether for any given user, there will be a small or large amount of data.
The solution is to load most or all of your data in the background, while you show your users relevant information that you have stored locally. For example, you could show them the latest cached weather information, until you have retrieved new data that shows the current weather for the current location.
Loaders are special purpose classes that manage loading and reloading updated data asynchronously in the background using AsyncTask.
Introduced in Android 3.0, loaders have these characteristics:
- They are available to every Activity and Fragment.
- They provide asynchronous loading of data in the background.
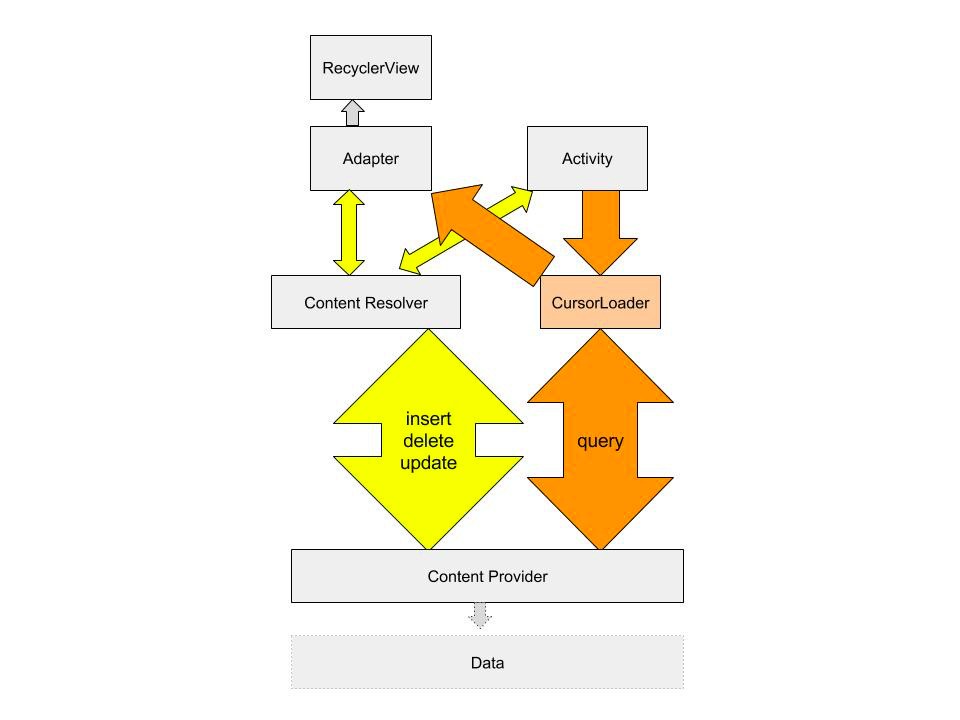
- They monitor the source of their data and automatically deliver new results when the content changes. For example, if you are displaying data in RecyclerView, when the underlying data changes, the a CursorLoader automatically loads an updated set of data, and when finished with loading, can notify the RecyclerView.Adapter to update what it displays to the user.
- Loaders automatically reconnect to the last loader's cursor when being recreated after a configuration change. Thus, they don't need to re-query their data to display it to you.
In a previous chapter you learned about AsyncTask as a general purpose class for doing work in the background, and you used an AsyncTaskLoader to keep data available to your users through configuration changes.
While you can create custom loaders by subclassing the Loader class, the Android framework provides CursorLoader that is straightforward to use and applies to many use cases. The CursorLoader extends AsyncTaskLoader to specifically work with content providers, saving you a lot of work.
Note that it is entirely possible to build custom loaders. But since the Android system provides you with an elegant solution that saves you a lot of work, consider how you can use it as given before implementing your own solution from scratch. Before writing your own loader, always consider whether you can improve your app design to work with a CursorLoader.
Loader architecture
As shown in the diagram below, the loader replaces the content resolvers query call to the content provider. The diagram shows a simplified version of app architecture with a loader. The loader performs querying for items in the background. It observes the data for you, and if the data changes, it automatically gets a new set of data and hands it to the adapter.

Implementing a CursorLoader
An application that uses loaders typically includes the following:
- An Activity or Fragment.
- An instance of the LoaderManager.
- A CursorLoader to load data backed by a ContentProvider. Alternatively, you can implement your own subclass of Loader or AsyncTaskLoader to load data from some other source.
- An implementation for LoaderManager.LoaderCallbacks. This is where you create new loaders and manage your references to existing loaders.
- A way of displaying the loader's data, such as a SimpleCursorAdapter or RecyclerViewAdapter.
- A data source, such as a ContentProvider (with a CursorLoader).
LoaderManager
The LoaderManager is a convenience class that manages all your loaders. You only need one loader manager per activity and typically get it in onCreate() of your activity, where you also register the loaders you are going to use.
The loader manager takes care of registering an observer with the content provider, which receives callbacks when data in the content provider changes.
The only calls to the loader manager you need to make are for registering a loader, and restarting it when you need to discard all the loaded data. The first parameter is the ID of the loader, the second is optional arguments, and the third is the context where the callbacks are defined.
getLoaderManager().initLoader(0, null, this);
getLoaderManager().restartLoader(0, null, this);
LoaderManager.LoaderCallbacks
In order to interact with the loader, you activity has to implement a set of callbacks specified in the LoaderCallbacks interface of the LoaderManager. When the state of the loader changes, these methods are called accordingly. The methods are:
- onCreateLoader()—Called when a new loader is created. Associates loader with the data source it should load and observe. (You don't have to do anything additional for the loader to observer your data source.)
- onLoadFinished()—Called every time the loader finishes loading. Trigger an update of user-visible data in this method.
- onLoaderReset()—When the loader is reset, you usually want to invalidate the currently held data until new data has been loaded.
To implement these callbacks, you need to implement LoaderManager callbacks for the type of loader you have. For a cursor loader, change the signature of your activity as follows, then implement the callbacks.
public class MainActivity extends AppCompatActivity implements LoaderManager.LoaderCallbacks<Cursor>
onCreateLoader()
This callback instantiates and returns a new loader instance of the desired type. Since the loader manager can be managing multiple loaders, an ID argument identifies the loader to instantiate. Once created, the loader will start loading data, and it will observe your date for changes, and reload as necessary.
To create CursorLoader, you need:
- uri—The URI for the content to retrieve from the content provider. This identifies the content provider and the data to observe to the loader.
- projection—A list of columns to return. Passing null will return all columns, which is inefficient.
- selection—A filter declaring which rows to return, formatted as a SQL WHERE clause (excluding the WHERE itself). Passing null will return all rows for the given URI.
- selectionArgs—You may include ?s in the selection, which will be replaced by the values from selectionArgs, in the order that they appear in the selection. The values will be bound as Strings.
- sortOrder — How to order the rows, formatted as an SQL ORDER BY clause (excluding the ORDER BY itself). Passing null will use the default sort order, which may be unordered.
@Override
public Loader<Cursor> onCreateLoader(int id, Bundle args) {
    String queryUri = CONTENT_URI.toString();
    String[] projection = new String[] {CONTENT_PATH};
    return new CursorLoader(this, Uri.parse(queryUri),
            projection, null, null, null);
}
Notice how this is very similar to initiating a content resolver:
Cursor cursor = mContext.getContentResolver().query(Uri.parse(uri),
projection, selectionClause, selectionArgs, sortOrder);
onLoadFinished()
Specify what happens with the data once the loader has acquired it. In this function you should:
- Release the old data.
- Save the new data and, for example, make it available to your adapter.
The cursor loader monitors the data for you, so you do not, should not under any circumstances, do it yourself.
The loader also cleans up after itself, so there is no need for you to close the cursor.
If you are using a RecyclerView to display the data, all you need to do is hand the data over to the adapter whenever loading or reloading has finished.
@Override
public void onLoadFinished(Loader<Cursor> loader, Cursor cursor) {
    mAdapter.setData(cursor);
}
onLoaderReset()
Called when a previously created loader is being reset, and thus making its data unavailable. You should clean all references to the data at this point. Again, if you are passing the data to an adapter for display in a RecyclerView, the adapter does the actual work, you just have to instruct it to do so.
@Override
public void onLoaderReset(Loader<Cursor> loader) {
    mAdapter.setData(null);
}
Using the data returned by the loader
In the practicals, you are using a RecyclerView that is driven by an adapter to display the data fetched by the loader. Once the loader receives the data, it hands the data over to the adapter through, for example, a setData() call. The setData() method updates an instance variable in the adapter that holds the most current data set, and notifies the adapter that there is fresh data.
public void setData(Cursor cursor) {
    mCursor = cursor;
    notifyDataSetChanged();
}
The benefits of cursors
You may have noticed that the database uses cursors, the content provider uses cursors, and the loader uses cursors. Using the same data type throughout your backend, and only unpacking it in the adapter, where the contents of the cursor are prepared for display, makes for a uniform backend with clean interfaces. This makes it easier to write the code, easier to test, and easier to debug. It also makes the code simpler and shorter.
Complete app with methods
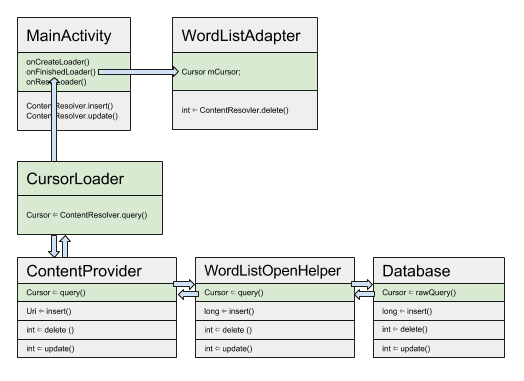
The following diagram shows the methods and data types that connect the different parts of an application that uses:
- A SQLite database to store data, and an SQLiteOpenHelper subclass to manage the database.
- A content provider to make data available to this (and other) apps.
- A loader to load data to display to the user.
- A RecyclerView.Adapter that displays and updates data shown to the user in a RecyclerView.
The green colored boxes show the call stack and journey of the cursor through the layers of the application for a query(). Note how inserting, deleting, and updating are still handled by the content resolver. However, the loader will notice any changes made by insert, delete, or update operations, and will reload the data as necessary.

Related practical
The related exercises and practical documentation is in Android Developer Fundamentals: Practicals.
Learn more
Developer Documentation:
